After a few high-gravity beers in a not-so-cool basement, I realized very quickly that maintaining proper fermentation temperature is probably the most important variable to nail down, after religious sanitation, that is. Too often I see newer home brewers spend hundreds of dollars on equipment like water-cooler mash tuns, large ported, stainless steel brew pots, and even kegs/forced carbonation and overlook fermentation completely. It is so important that personally, I wouldn’t even think of recommending transitioning to all-grain without some reliable-consistent fermentation control.
Most of us will (conservatively) spend 10 hours brewing, bottling, creating recipes, shopping for ingredients, making starters, etc. Why would you leave all that hard work up to chance? If you have a good cool basement you may be able to get by for some time brewing lower gravity beers (below 6%) in the cool months of the year, but the summer heat combined with the exothermic reaction of fermentation can contribute significant off flavors in that wort you worked so hard on. Also, from a scientific standpoint, unless you brew at the same time of year and your weather is that invariable, you are going to want to have the ability to REPEAT your success, or fix your minor failures caused by temperature. Moreover, tightly controlling the fermentation temperature within the recommended temperature band allows you to fine tune the ester profile to your liking.
Disclaimer: Being an Engineer, I have a heightened sense of anality. I believe there is always a right way to do things, despite the fact that many other solutions exist that are viable. The best solution is measured against a theoretical that is impossible to achieve; but that doesn’t stop me from trying!
 Materials:
Length of FlexWatt Heat Tape (11″ width) or THGHeat heat tape (12″ width) per below:
– 6.5 Gallon Glass Carboy: 41″
– 6.5 Gallon Ale Pail: 36″
– 5 Gallon Glass Carboy: 34.5″
6 foot cord with copper clips or similar (grommet type)
Electrical Tape: about 20″ total used.
Tools:
Scissors
Pliers (I used Lineman’s pliers but Needle-nose should also work well)
Time:
About 10 minutes from start to finish
Cost:
(2′-3′) 11″ FlexWatt @ $4.79/foot or 12″ THGHeat heat tape @ $3.00/foot
(1) Cord with clips @ $4.79/ea or Cord with Grommet @ $4.00/ea
Electrical tape: $1.77/roll (which is a lot more than you need)
TOTAL: $15 – $20
Directions:
1. Cut heat tape to length based on chart below:
– 6.5 Gallon Glass Carboy: 41″
– 6.5 Gallon Ale Pail: 36″
– 5 Gallon Glass Carboy: 34.5″
Note: Make sure you don’t cut through a black Heating element but through the clear space between them. If you want to be extra cautious, you can fold a long piece of electrical tape (11″ long) in half over the entire cut end so there is no risk of shock.
2. Place clips over METAL strip embedded in plastic.
Note: You could have just crimped the clips as intended… I chose to mount them on the side of the heat tape so the wire side of the clip was closer to the cut edge so that the cord wasn’t in the way when wrapping. Notice that the clips weren’t intended to be used this way so I had to cut away some of the clear plastic material so they would crimp on the metal and make proper contact.


3. Crimp hard with the pliers to firmly fix the small teeth on the inside of the clip through the plastic and the conducting silver ribbon along the edge of the heat tape and into the clip on the other side.

Note: You will have to pull the two ends of the cord apart to get the second clamp to reach the other side of the heat tape.
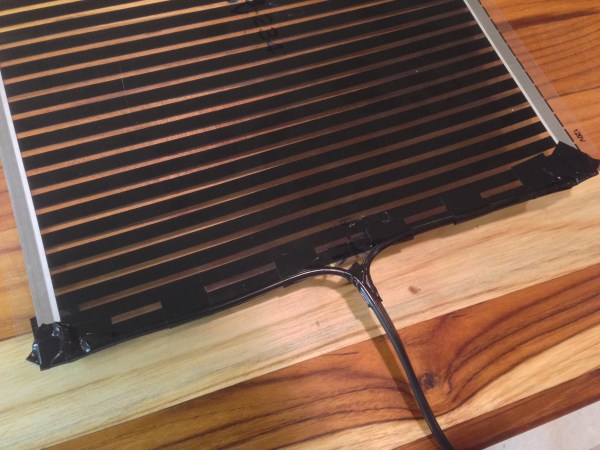
4. Use small pieces of tape to cover any exposed metal to prevent any chance of electrical shock as shown below:


5. Affix the cord to edge of the tape with small pieces (~1.5″-2″) of tape for a neater look and to secure the cord and prevent stress on the end connectors. I will also make for a better fit when wrapping around your carboy or fermentation bucket. I also wrapped a piece of tape at the split in the cord to prevent it from further separating.

6. Success!! Just wrap around your fermentation vessel securing with another small piece of tape or a some type of strapping (string, rubber band etc.) and plug it into the heating side of your favorite temperature controller!

Note: Because the slight taper in the fermentation bucket, you will have to wrap it on an angle to get the most contact with the plastic surface. Where the two ends meet, the bottom will slightly overlap and the top will have a gap; this is preferred. With a glass Carboy, that isn’t a problem…
 Note: You may also want to use some insulating wrap to keep the heat in if you are planning on fermenting in a very cold environment (like your garage in the winter, for example)
The thing I love most about the homebrewing culture is the whole DIY aspect of it. Thanks for this tutorial, I’m going to attempt this myself soon since my basement here in Jersey gets on the cooler side during the winter.
Cheers!